Firebase
Honeycomb comes with methods and configurations to deploy tasks with Firebase. These tools make it possible to reach a wider audience by hosting your task online.
Setting up Firebase
Members of Brown University should submit a support ticket to have their Firebase project created. Members of other institutions should check to see if their university has access to Google Cloud.
Otherwise, a personal Firebase account can be created for free. Please follow the firebase documentation for creating a new project.
Adding Products
First we'll configure Firebase Hosting and Cloud Firestore on your project.
Log in to Firebase with your Google account on the Firebase console
Navigate to your project from the console
Register a new web app to your project (Register your app)
noteWe recommend giving your web app the same name as your task's repository
Add Firestore Database to your project (Create a Cloud Firestore database)
noteChoose
production modefor the starting mode and the default "Cloud Firestore Location"
The Firebase project is now fully set up! Now we'll connect your task to that project from your computer.
Installing the Command Line Interface
The Firebase CLI is installed with the node package manager just like the rest of Honeycomb's dependencies. Be sure to log in with same account you used when logging into the console!
firebase login
A command not found error usually indicates firebase-tools has not been installed correctly. Re-running npm install -g firebase-tools should fix this issue.
Connecting Your Firebase Project
- Change the default project name of your task in
.firebaserc
{
  "projects": {
    "default": "<your project name>"
  }
}
Copy the web app credentials from the Firebase console to the corresponding variables in
.env.firebaseReturn to your project on the Firebase console
Navigate to your project setting

Scroll down and copy the auto-generated values from the Firebase console to the corresponding variables in the
.env.firebasefile in theenvfolder of your Honeycomb task repo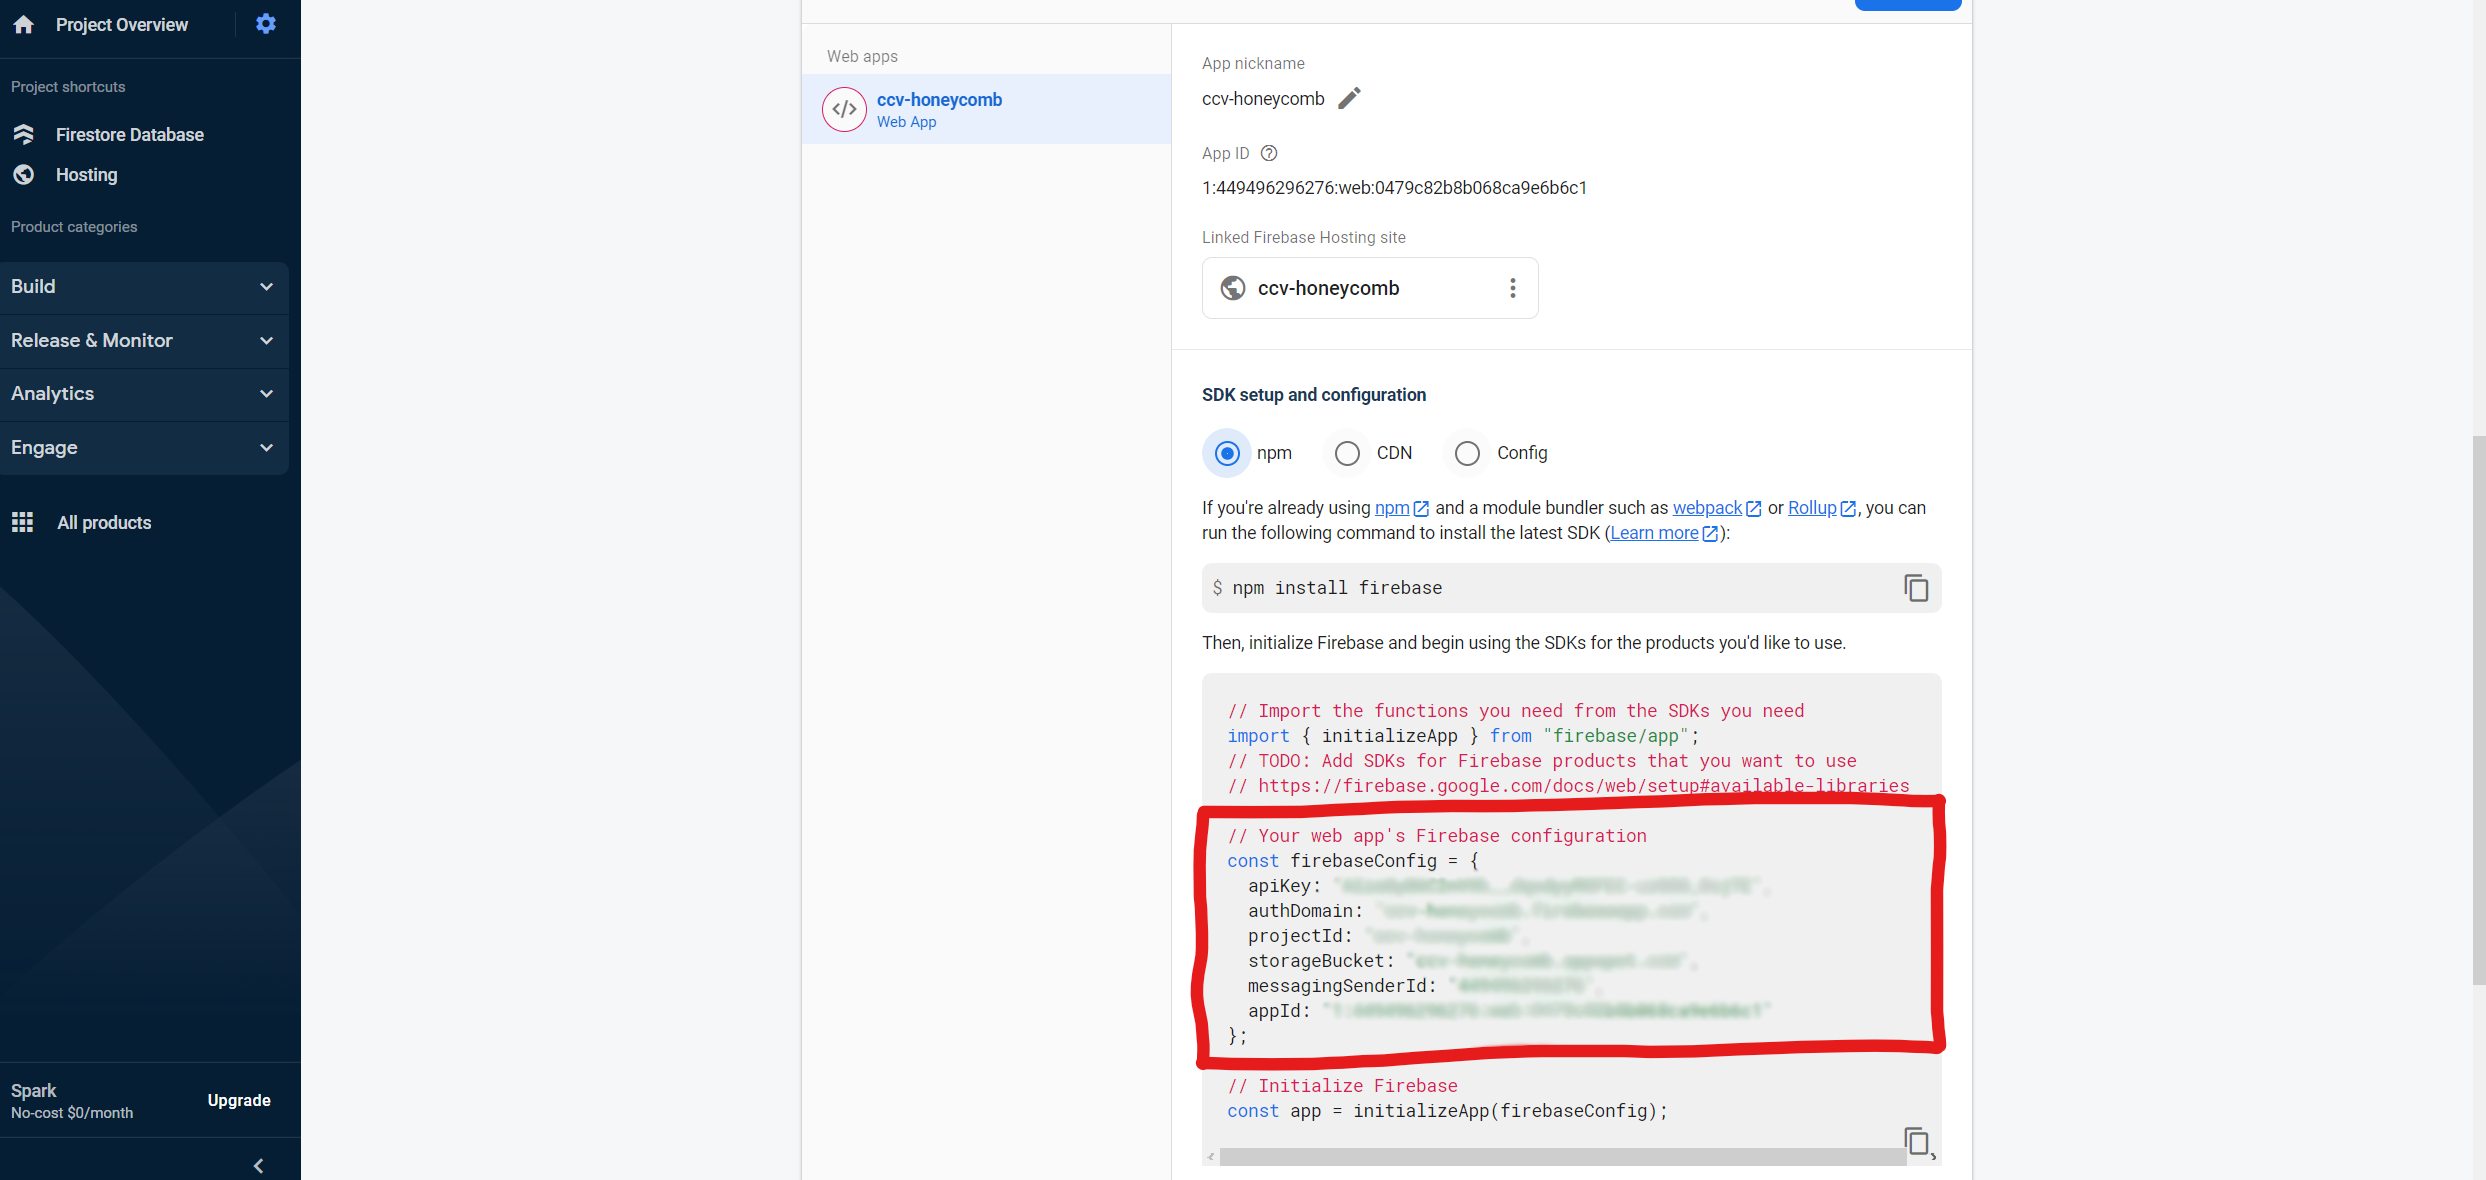 env/.env.firebase
REACT_APP_FIREBASE="true"
REACT_APP_apiKey=
REACT_APP_authDomain=
REACT_APP_projectId=
REACT_APP_storageBucket=
REACT_APP_messagingSenderId=
REACT_APP_appId=
Additional variables may be present in the console, they do not need to be copied.
Deploy the default Firestore security rules
firebase deploy --only firestore:rules
Your task is now connected to an initialized Firebase project!
Developing With Firebase
Two terminal windows must be used while developing for Firebase. See here for instructions on splitting terminals in VSCode.
npm run dev:firebase
npm run firebase:emulators:start
Honeycomb is now running in the browser and connected to data on an emulated instance of Firestore. It may be viewed on localhost:4000.
Honeycomb populates the Firestore emulators with the study s1 and participant p1.
Deploying on Firebase
Firebase deployments are handled automatically following Continuous Integration Continuous Development (CI/CD) practices using GitHub Actions. Here we will create custom actions that are connected to the task's Firebase project.
Execute the following command to begin initializing Firebase hosting via GitHub actions. Be sure to follow the instructions below as the prompts appear.
firebase init hosting:github
- The window should log you in automatically; if not, follow the prompts to log in with the same account you used in the console
<username>/<repository name>refers to the name of your repository in Github - be sure it's typed correctly!- Enter
yfor the prompt "Set up the workflow to run a build script before every deploy?" - Enter
npm install && npm run build:firebasefor the prompt "What script should be run before every deploy?" - Enter
yto overwrite the current workflow file - Enter
yfor the prompt "Set up automatic deployment to your site's live channel when a PR is merged?" - Enter
mainfor the prompt "What is the name of the GitHub branch associated with your site's live channel?" - Enter
yto overwrite the current workflow file
Firebase will update the files firebase-hosting-pull-request.yml and firebase-hosting-merge.yml inside the .github/workflows/ directory. Ensure the correct run script is present in both files.

Managing Data
Honeycomb ships with a CLI script for managing data in Firebase. A local service account must be created in order to use it.
Setting up a Service Account
Service accounts are accounts that are not attached to a human user. They authorize access to a Firebase project without someone physically logging in online. We use a service account to give the download script access to the Firestore database automatically.
Return to the project settings your project on the Firebase console
Click on the "Service accounts" tab
Near the bottom, click "Generate new Private key" and "Generate Key"
Rename the key
firebase-service-account.jsonand move it to the root directory of your task - be sure the file looks grayed out and is not picked up by git!
A service account has total administrative access to ts Firebase project. The file and keys inside should never be shared and never committed to GitHub.
Using the CLI Script
npm run cli
The CLI script will guide you through the steps needed to manage your data appropriately:
Whether you wish to download or delete data
Entering the ID of a given study
Entering the ID of a given participant on that study
Selecting the sessions to download/delete
infoSPACE selects a single session and A toggles every session
The download script will prompt you for where the data should be saved. It defaults to ., which is your current folder. The folder must exist before running the script.
Further Reading
The Firebase Documentation details its Emulator Suite in much greater detail.
Security Rules
Honeycomb uses security rules to authenticate participants and studies for each task. By default participants must be registered to each study in order to complete the task.
Firestore rules are defined in the firestore.rules file in the home directory. Note the highlighted lines:
rules_version = '2';
service cloud.firestore {
  match /databases/{database}/documents {
    match /participant_responses/{studyID}/participants/{participantID} {
      allow create, read:
      if
        // Allows any combination of studyID and participantID to be created in Firebase
        true
        // participantID must be in the registered_participants array in the registered_studies/{studyID} document
        // participantID in get(/databases/$(database)/documents/registered_studies/$(studyID)).data.registered_participants;

      // experimentID must be in the data subcollection
      match /data/{experimentID} {
        allow create, read: if true

        // trialID must be in the trials subcollection
        match /trials/{trialID} {
          allow create, read: if true
        }
      }
    }
  }
}
Lines 3 and 4 indicate that Honeycomb attempts to connect to a document at /databases/{database}/documents/participant_responses/{studyID}/participants/{participantID} where studyID is a given study and participantID is a given participant within that study.
Line 5 indicates how Honeycomb can interact with that document. Note that Honeycomb cannot update or delete data! You must use the CLI script to delete data.
Lines 6 through 10 defines our rule for creating a document for a given participant at participant_responses/{studyID}/participants/{participantID}. Honeycomb ships with two possible rules:
Line 8 specifies
truewhich allows any combination ofstudyIDandparticipantIDto be created in Firebase.infoThis is the default rule Honeycomb ships with. It is recommended to leave this rule as is and handle the registration of studies in another tool such as Prolific.
Line 10 only allows a
participantIDto be created if the value is in an array calledregistered_participantsinside of a document atregistered_studies/{studyID}. This ensures pre-registration of every study and participant - the next section explains how to register studies.
Firestore rules define every valid path for data in your project. Attempting to connect anywhere besides the paths in your Firestore rules will be automatically denied, even if you have manually saved data elsewhere. This is why firestore.rules contains the nested rules in lines 12 - 20. These should be left alone.
Registering Studies
Navigate to your Firestore Database in the Firebase console
Click "Start collection"
Enter
registered_studiesas the collection IDEnter the id of your study as the document id
Click "Add Field".
Enter
registered_participantsas the field name, and set the type "array"Add the id of each study participant to the array as type "string"

The study should look like this when you're finished:
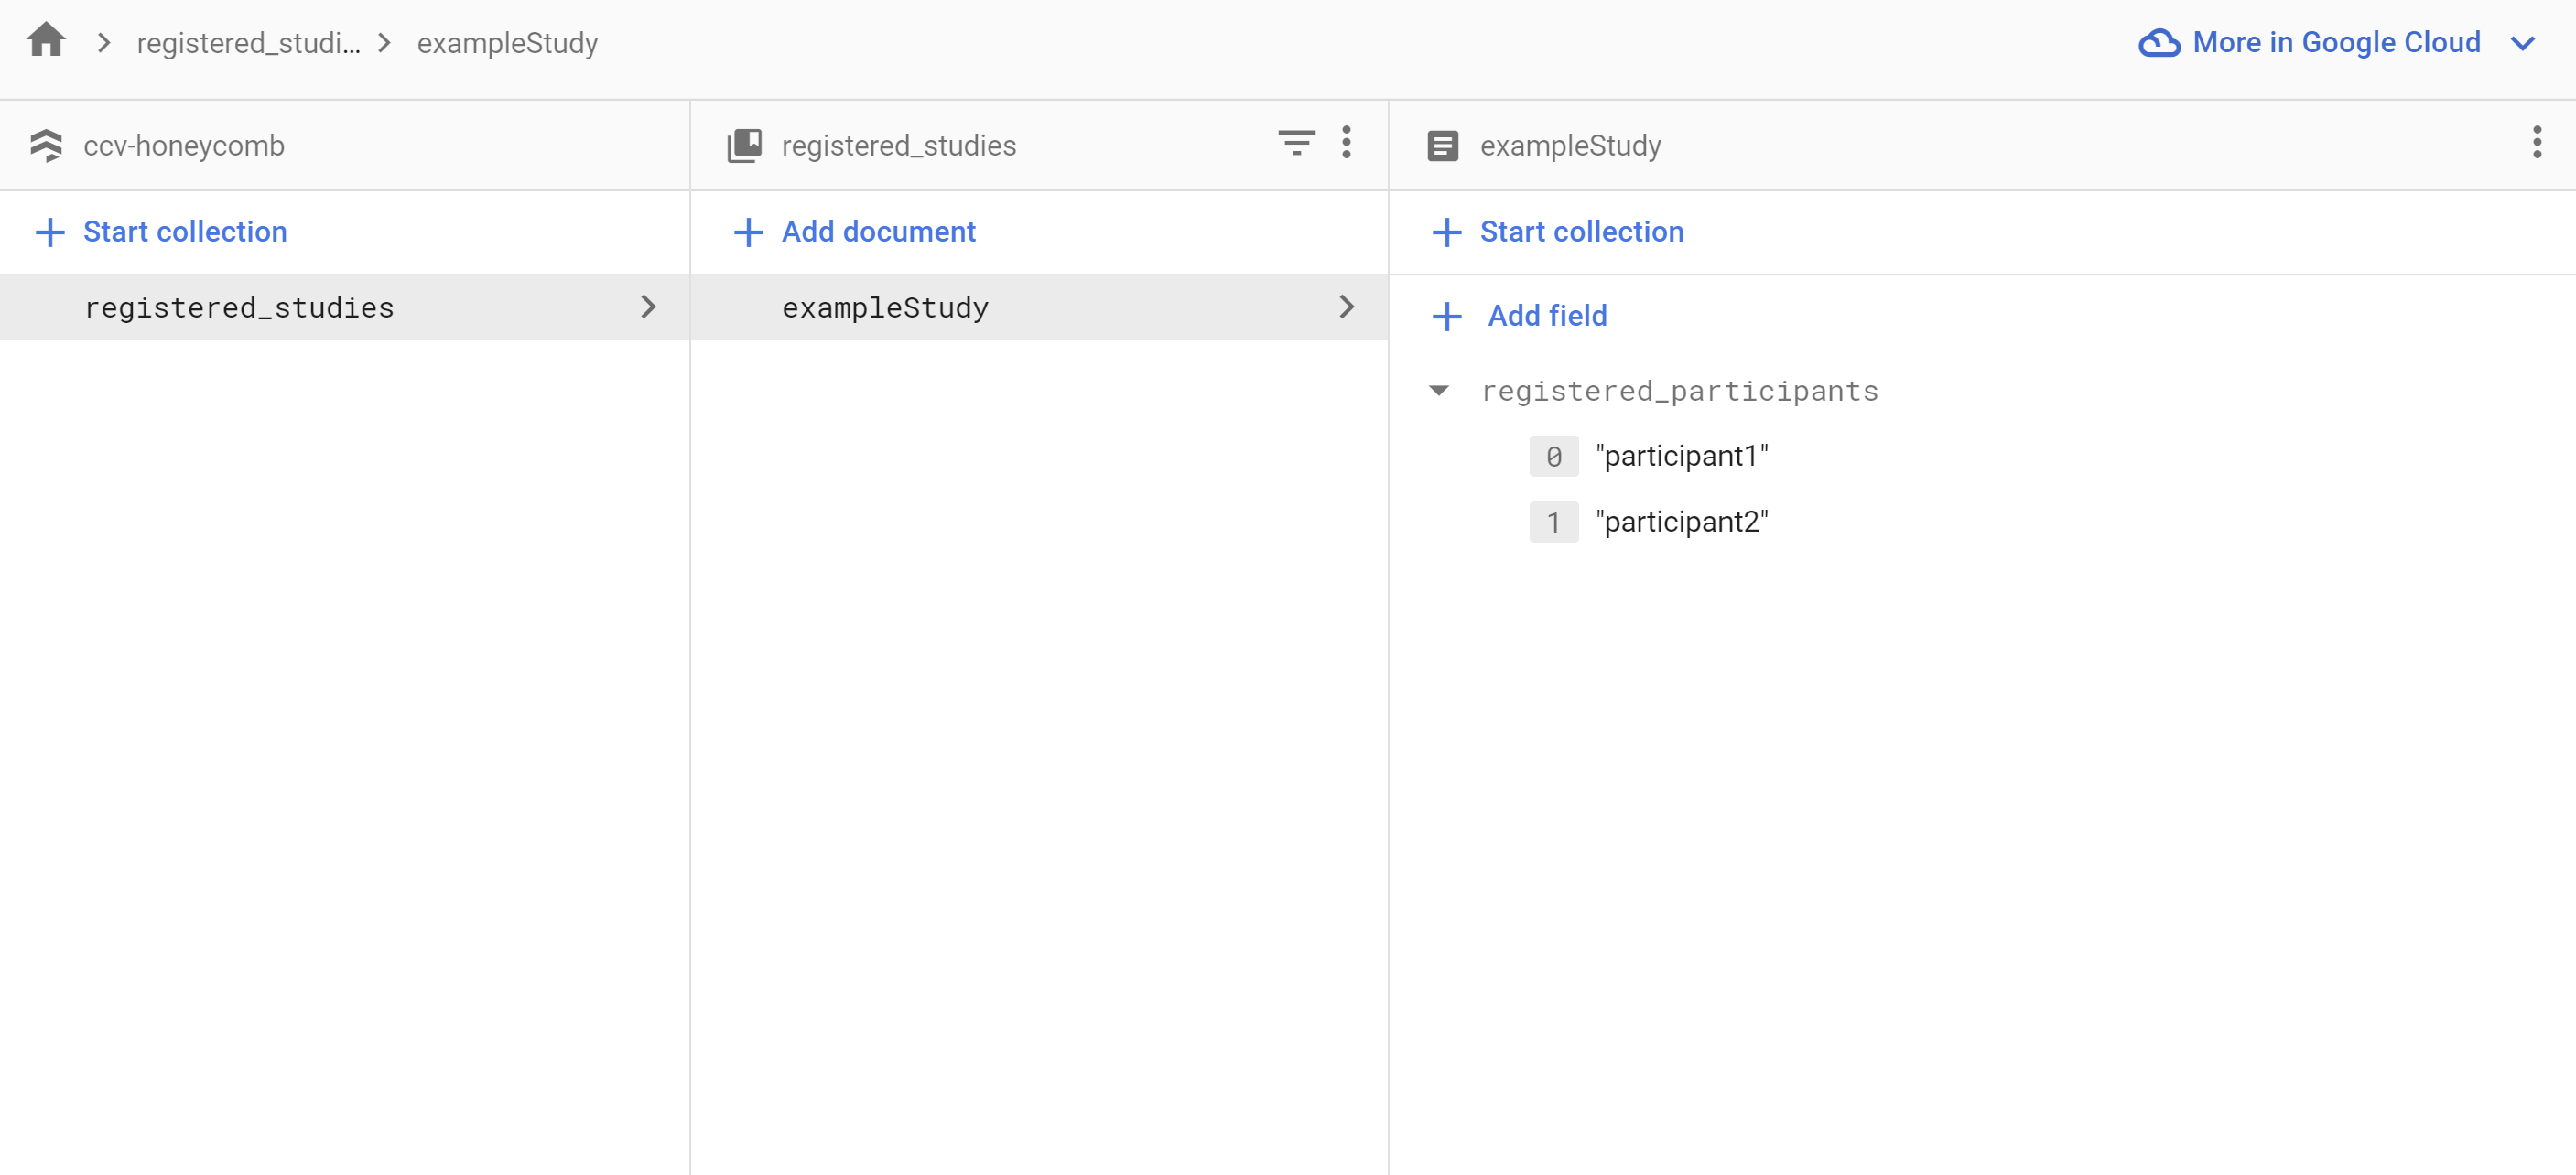
Additional studies are created as documents inside the registered_studies collection